

How To Draw A Compass Rose? A Step By Step Guide
Have you learned what a compass rose is and now desire to draw one? I’ll demonstrate how to draw a compass rose in this guide. Let’s get going!
Table of Contents
Required Materials
- Paper
- Eraser
- Pencil
- Coloring Materials
How To Draw A Compass Rose?
- The center of a cross should be drawn on a piece of sturdy art paper.
Make two marks on the paper that are equally spaced from the top, and then lightly draw a horizontal line between them going from left to right with a pencil.
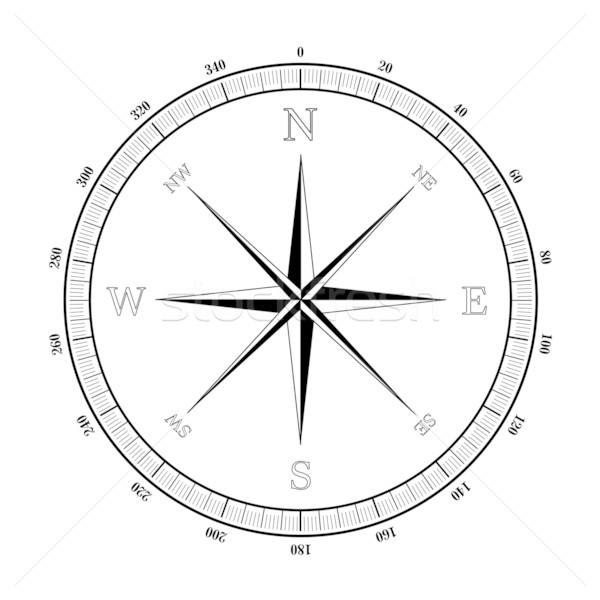
Before lightly drawing a vertical line from top to bottom, mark the paper’s center point a few inches above and below the horizontal line.
- Use your drafting compass to draw a sizable circle.
- Mark the outer circle with a protractor at 45 degrees, 135 degrees, 225 degrees, and 315 degrees. Then, with your pencil, lightly draw connecting lines from the 45 degrees mark to the 225 degrees mark and from the 315 degrees mark to the 135 degrees mark.
- Using a protractor again, make marks around the outer circle at the following points:
22.5°, 67.5°, 112.5°, 157.5°, 202.5°, 247.5°, 292.5°, 337.5°
- Connect the following points:
22.5° and 202.5°, 67.5° and 247.5°, 112.5° and 292.5°, 157.5° and 337.5°
- Another circle with a radius of 2″ should be drawn.
- Draw a third circle with a light line through the center after adjusting your compass for a radius of 1″.
- Draw the arrows for the four cardinal directions in a light manner. Draw to the intersection of the 45-degree mark and the innermost circle starting at the 0° point (N) on the outer circle.
- From the 0° mark to the point where the 315° mark and the innermost circle converge, follow the same procedure.
- ]Repeat this process at the 90° point (E), drawing lines to intersect the innermost circle and the 45° and 135° points; the 180° point (S), drawing lines to intersect the innermost circle and the 135° and 225° points; and from the 270° point (W), drawing lines to intersect the innermost circle and the 225° and 315° points.
- Draw the auxiliary points very loosely. Draw to the 22-point intersection starting at the 45-degree point (NE) on the outer circle.5° mark and the right side of the N cardinal point.
- From the 45-degree marker to the 67-degree intersection, repeat the process.5° mark and the top side of the E cardinal point.
- Continue along this path by drawing lines to intersect the bottom of the E cardinal point and the right of the S cardinal point at the 135° point (SE), the left of the S cardinal point and the bottom of the W cardinal point at the 225° point (SW), and the top of the W cardinal point and the left side of the N cardinal point from the 315° point (NW).
- The last two points should be added, starting with the NNE point. The outer circle and the 22 should be the starting point.5° mark, and draw a line from the outer circle to the intersection of the middle circle and the right side of the Repeat from the N cardinal point starting at the 22.5° mark to the intersection of the middle circle and the top side of the NE cardinal point.
- At the 67, repeat this procedure.5° point (ENE), intersecting the middle circle, the bottom of the NE cardinal point, and the top of the E cardinal point with connecting lines.
- the area between the 112.5° point (ESE) and the top and bottom of the E and SE cardinal points.
- the right side of the S cardinal point and the bottom of the SE cardinal point, starting at the 157.5° point (SSE).
- From the 202.5° point (SSW) to the left side of the S cardinal point and the bottom of the SW cardinal point. From the 247.5° point (WSW) to the top of the SW cardinal point and the bottom of the W cardinal point
From the 292.5° point (WNW) to the top of the W cardinal point and the bottom of the NW cardinal point
Along with the 337.5 degree point (NNW), the left side of the N cardinal point, and the top of the NW cardinal point.
- Add color to suit your final environment. See more about How To Light Campfire In Ark?
Tips Of Painting
Keep these tips in mind to make this lovely pattern for a successful outcome!
- The floor should be scrubbed and power washed to prepare it. Spend a few days letting it dry.
- Apply texture-enhancing paint to the entire floor. As a backdrop, this will serve.
- The compass should then be traced on the ground using markings made as shown in the drawings.
- Repeat this on the right half of each point, painting it with a complementary color that is darker.
- After painting is finished, let everything cure for 24 hours (or however long the paint manufacturer suggests). To protect the paint, seal the floor once the project is finished.
- Each star point’s left half should be painted a light color after being painted with a mask.
- Apply two to three light coats. After that, before peeling off the masking tape, cut the paint away from the tape using boxcutter.
What Is 202.5 Degree Compass Point?
202.5 as a compass point is Between South (180 degrees) and Southwest (225 degrees), South by Southwest is the center value, or 22.5 degrees, at 45 degrees.
Conclusion
The compass rose has a lengthy and interesting past that dates back to antiquity in Greece. It is an important tool for cartographers and navigators all around the world, and there are many lovely depictions of this straightforward, useful equipment.

More Stories
Is Kinetic Sand Toxic? All You Want to Know
Children older than three are best suited to use kinetic sand. In essence, you want to be sure that even...
How Long is a Toilet Paper Roll? Everything You Need to Need to Know
To begin with, how long is a toilet paper roll? The typical toilet paper roll is approximately four and a...
How To Draw A Book? An Easy Step-by-step Tutorial
Looking for your next creative muse? You don't need to look very far. You can find some of the best...
How To Make Playdough Softer? Have A Try
Each and every person enjoys playing with playdough, regardless of age. Everyone enjoys using playdough to create forms and sculptures,...
How To Make Playdough Soft Again? Easy Ways
Play-Doh becomes hard, flaky, and challenging to work with when it dries out. The putty is made up of of...
How To Draw A Star? An Easy Step-by-step Guide
Anyone would be familiar with a star because we have all seen them in the night sky. Even though we've...